columns the process can be time consuming and require that you rethink exactly what needs to be hidden. With custom views, you can preserve your print settings and hidden row and column settings as a view. Then when you get ready to print you simply invoke the view and it not only hides the appropriate rows and columns, but also changes your print setting to those that were in effect when the view was created.
A question we get frequently is “How can I get the cursor to always be in a certain cell each time I go to a specific sheet?” Custom views can solve this problem. One of the attributes of custom views is that custom views also preserve the cursor location with the view. When you invoke a particular custom view, the cursor will always return to the exact location it was when the view was created.
So for example, if you have a very large workbook with lots of worksheets and frequently need to go to a specific sheet and have the cursor be in a specific location when you are in that sheet, you can create a view with that sheet active and the cursor located where you want it. Any time you invoke this view that sheet will become the active sheet and the cursor will be at the desired location. The following are the steps for creating a custom view:
- Move to the desired sheet and place the cursor where you want it when you come to this sheet.
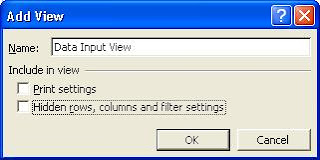
- Issue the command View – Custom Views and select Add from the Custom Views dialog box.
- Name your view and uncheck Print Setting and Hidden rows, columns and filter settings if you are going to use the view only for navigation.
